Measure drawings on screen, straight into Excel.
Take-Off by WEQS measures areas, lengths and counts from PDF, DXF, DWG and DWFx drawings, and puts the quantities in a list you can export to Excel. This manual takes about ten minutes to read and covers everything you need for a first take-off.
Download this manual as a PDF1.2 MB · the same pages, for reading offline or sending on
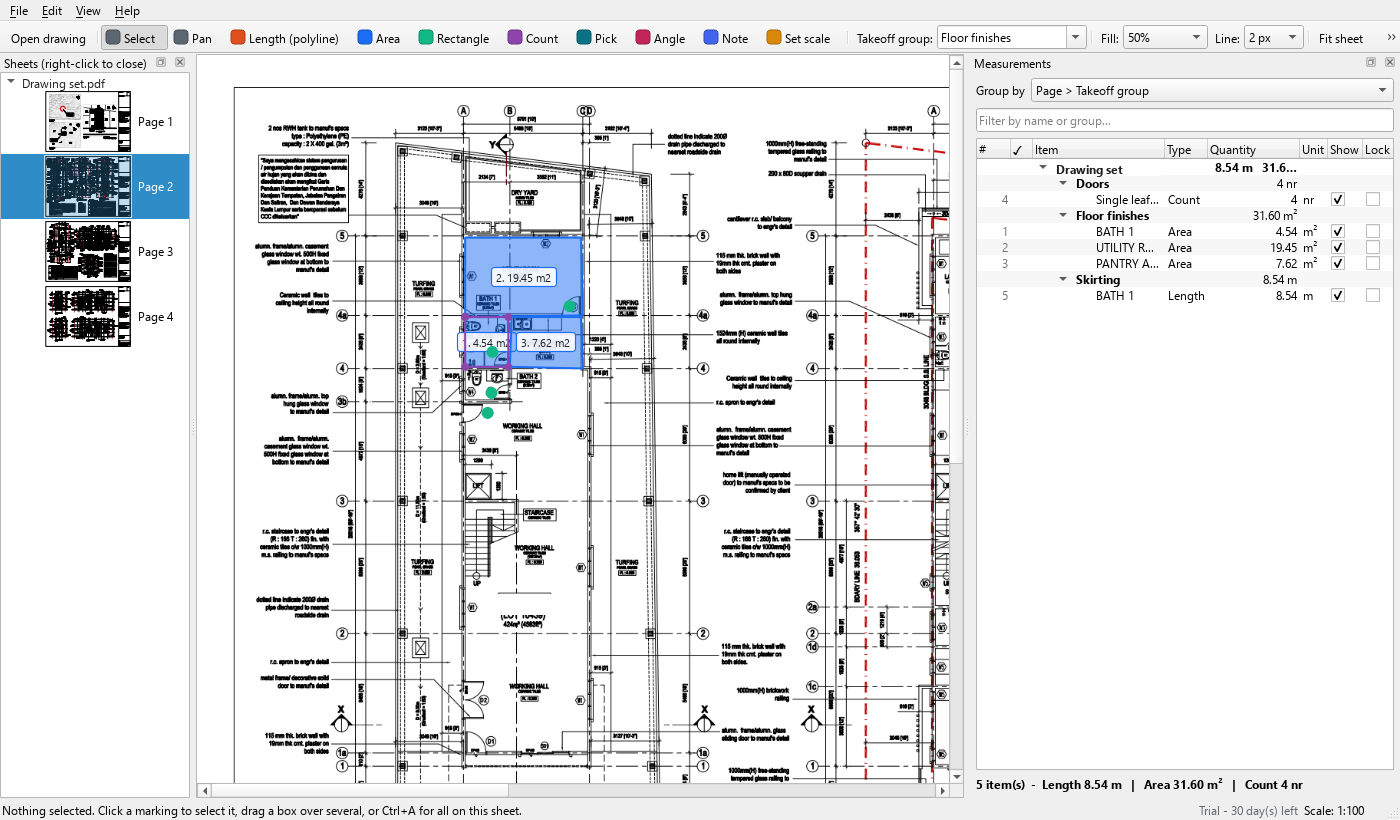
Contents
- Before you start
- The window
- Open a drawing
- Set the scale
- Choose a take-off group
- Measure
- Fix a marking
- The measurement list
- Export to Excel, print to PDF
- Save your work
- Trial, licence and subscription
- Keyboard shortcuts
- Getting help
1. Before you start
- Windows 10 or 11. The program installs for your own user account, so no administrator rights are needed.
- Drawings: PDF (plotted from CAD or scanned), DXF, DWG and DWFx. DWG files need the free ODA File Converter on your PC; Help > DWG setup shows how to install it. The older binary DWF is not read; ask for DWFx, PDF or DWG.
- The free trial lasts 30 days with every feature on. No card, no account. Section 11 explains what happens after that.
Installing
- Download Take-Off by WEQS Setup from wequantitysurveyor.com/software and run it.
- Windows SmartScreen may say the publisher is unknown. Click More info, then Run anyway. The installer is not yet code-signed; that is all this warning means.
- Click through the installer. The program starts when it finishes, and there is a shortcut in the Start menu. Project files (
.tko) open with a double-click.
2. The window
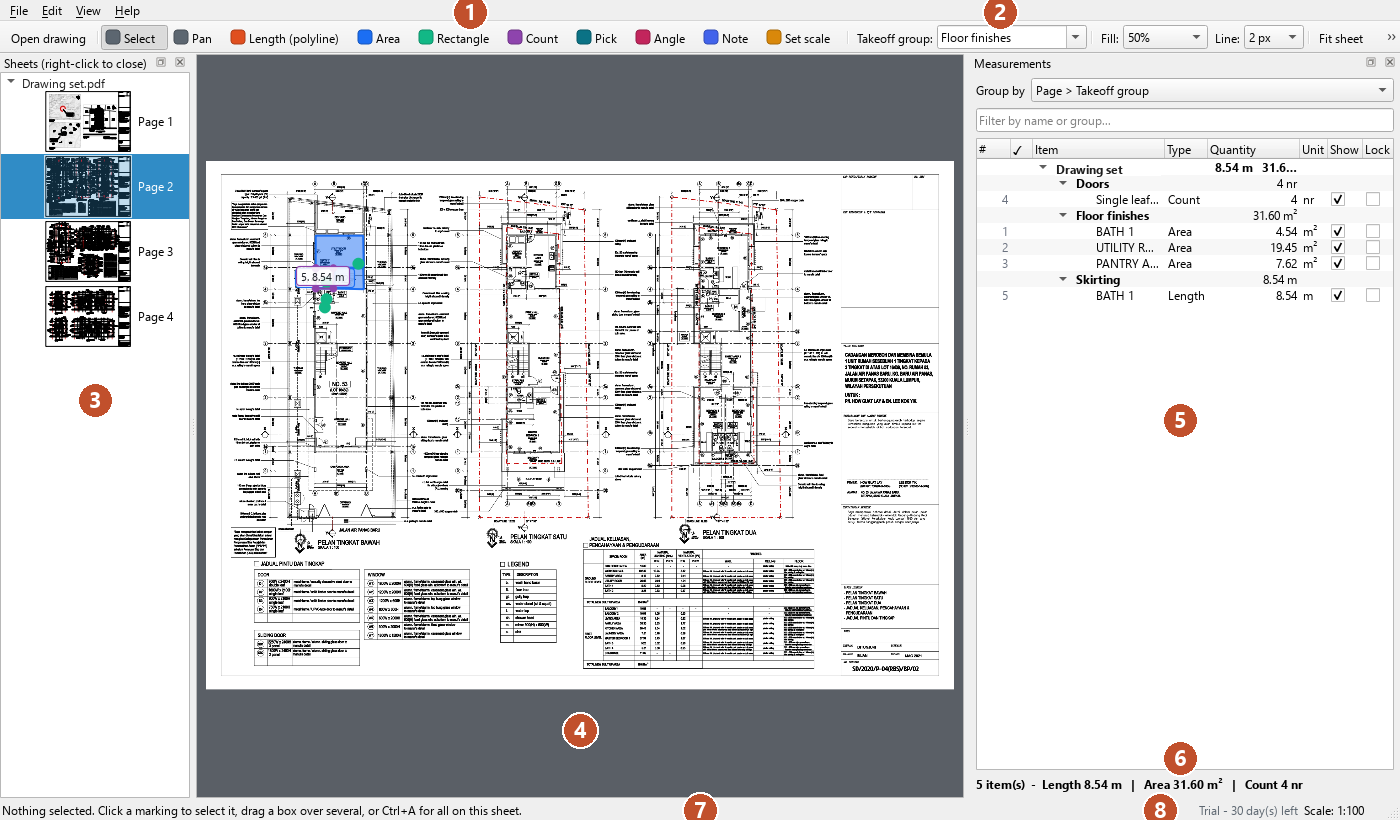
- Toolbar. Open drawing, the Undo and Redo arrows (hover over one to see what it would undo), then the tools: Select, Pan, Length, Area, Rectangle, Count, Pick, Angle, Note, Text, Set scale; then Fit, the rotate buttons, the Drawing colour box and Dark background.
- Take-off group. Everything you trace goes into the group shown here, in that group's colour.
- Formatting row. Under the toolbar: Colour, Fill, Line, Text and Labels. Each one restyles whatever is selected, and is what the next marking gets. An area is drawn with a pale tint of its colour inside a deeper outline, so the room names and dimensions on the drawing still read through it; Fill sets how opaque that tint is, from clear to solid.
- Sheets. Every page of every drawing you have opened, with a preview. Click one to work on it.
- Properties. Under the sheets: whatever is selected — its name, group, quantity, checking status, deduct, lock, show and note, changed right there — and its history.
- The drawing. Wheel to zoom, hold Space and drag (or drag with the middle button) to pan, Ctrl+0 to fit the sheet. While it moves, the drawing is shown from a ready-made picture so it keeps up with the wheel even on a big road layout; a moment after it stops it is drawn sharp at the screen's own scale — on a heavy PDF that takes a second, and you can carry on working meanwhile.
- The measurement list. Every marking with its number, name, type, quantity and unit, grouped the way you choose.
- The summary line. Totals for the whole list, or for the rows you have selected.
- The status bar always says what to do next, and reads out each marking as you select it.
- Scale and trial. The sheet's scale, and how many trial days are left.
The Sheets and Measurements panels can be dragged to the other side or closed; the View menu brings them back. F11 hides both to give the drawing the whole window.
3. Open a drawing
Press Ctrl+O, or drag the files onto the window. You can open several at once.
- A multi-page PDF becomes one sheet per page in the Sheets panel.
- A DXF or DWG becomes one sheet per paper-space layout, plus the model space. The CAD layers panel (View menu) switches layers on and off, so a cluttered plan can be reduced to walls and doors.
- CAD colours are made for a black screen, so on the white sheet the light ones (white, yellow, cyan, light grey) are darkened to stay visible. Prefer the CAD look? View > Dark background lays the sheet on dark paper in the file's own colours.
- A PDF plotted with the black CAD screen left as its background is recognised when it opens and shown on white paper with its colours kept — the status bar says so. View > Dark background shows it as plotted.
- Sheet the wrong way up? View > Rotate sheet (Ctrl+R, or the toolbar) turns it a quarter turn; the project remembers.
- The Drawing box on the toolbar shows the drawing in full colour, greyscale or monochrome; Dark background lays it on black paper — a PDF page is moved onto black with its colours kept, so a red line stays red. If a drawing looks black with odd colours, this is on: untick it in the View menu. Your markings keep their colours either way, which is what makes them stand out on a grey plan.
- A DWFx opens as one sheet per page, named as in the file. It has exact lines to snap to like a DXF, but it is a plotted sheet, so set its scale like a PDF: from a printed dimension, or the plot ratio. If the sheet says SCALE 1:100, the Set scale dialog offers it. It is drawn exactly as Autodesk Design Review draws it — fills, lines and text in the sheet's own order — so what the drawing covers stays covered.
- Dropping a
.tkoproject opens that project with its drawings.
4. Set the scale
Until a sheet has a scale, every quantity on it reads 0.000 in red. That is deliberate: nothing is measured until the program knows what a unit on the sheet is worth. Press Ctrl+K (Edit > Set sheet scale) or pick the Set scale tool.
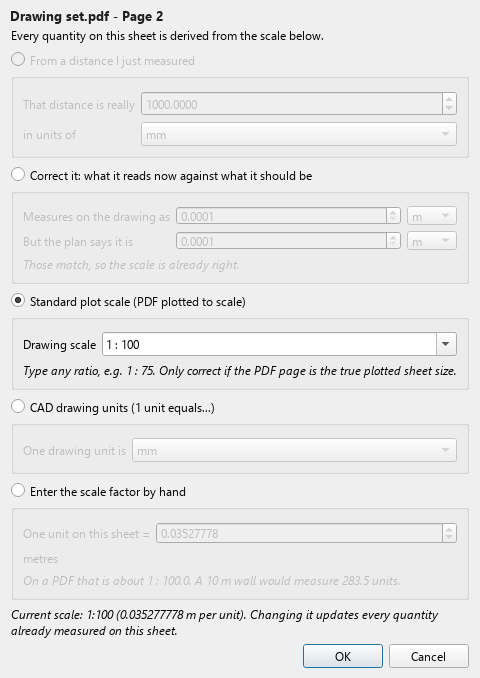
- From a distance you measured is the reliable way, and the only way on a scanned drawing. With the Set scale tool (K), click the two ends of a printed dimension, a grid spacing or a scale bar, then type what that distance really is, for example
3000mm. - Standard plot scale (1:50, 1:100, or any ratio you type) is right only when the PDF or DWFx was plotted at true sheet size. Check it against one printed dimension before you trust it.
- CAD drawing units are read from a DXF or DWG automatically. Check once.
- Correct it from a reading (Ctrl+Shift+K) fixes a scale that is nearly right: type what a wall measures now and what the plan says it is, and the whole sheet is corrected by that ratio.
The scale belongs to the sheet. Change it and every marking on that sheet is re-valued at once, so it is never too late to correct it.
5. Choose a take-off group
In the toolbar, type a group name or pick one: Floor finishes, Skirting, Doors, whatever your bill needs. Everything you trace from then on lands in that group, in its colour, and the Excel export sums each group separately. Traced something into the wrong group? Select it and press Ctrl+G to move it.
6. Measure
| Tool | Key | How |
|---|---|---|
| Area | A | Click each corner of the room. The outline closes itself. |
| Rectangle | R | Click two opposite corners. |
| Length | L | Click along the run, as many points as you like. The segments are added up. |
| Count | C | One click per item: doors, sockets, columns. One marking holds the whole count. |
| Pick | P | Click a line or a closed outline that is already in the drawing and take the whole thing in one go. Works on CAD files and PDFs plotted from CAD, not on scans. |
| Angle | D | Three clicks: one side, the corner, the other side. Reads in degrees, needs no scale, and never appears in a total. |
| Note | N | One click, then the words: a remark pinned to the drawing, such as check beam size. The chip stays the same size whatever the zoom. |
| Text | T | Click where the box's top-left corner should sit, then type, on as many lines as you like. Words on the drawing that zoom with it and print with it. Right-click the box to edit it or make the text bigger or smaller. |
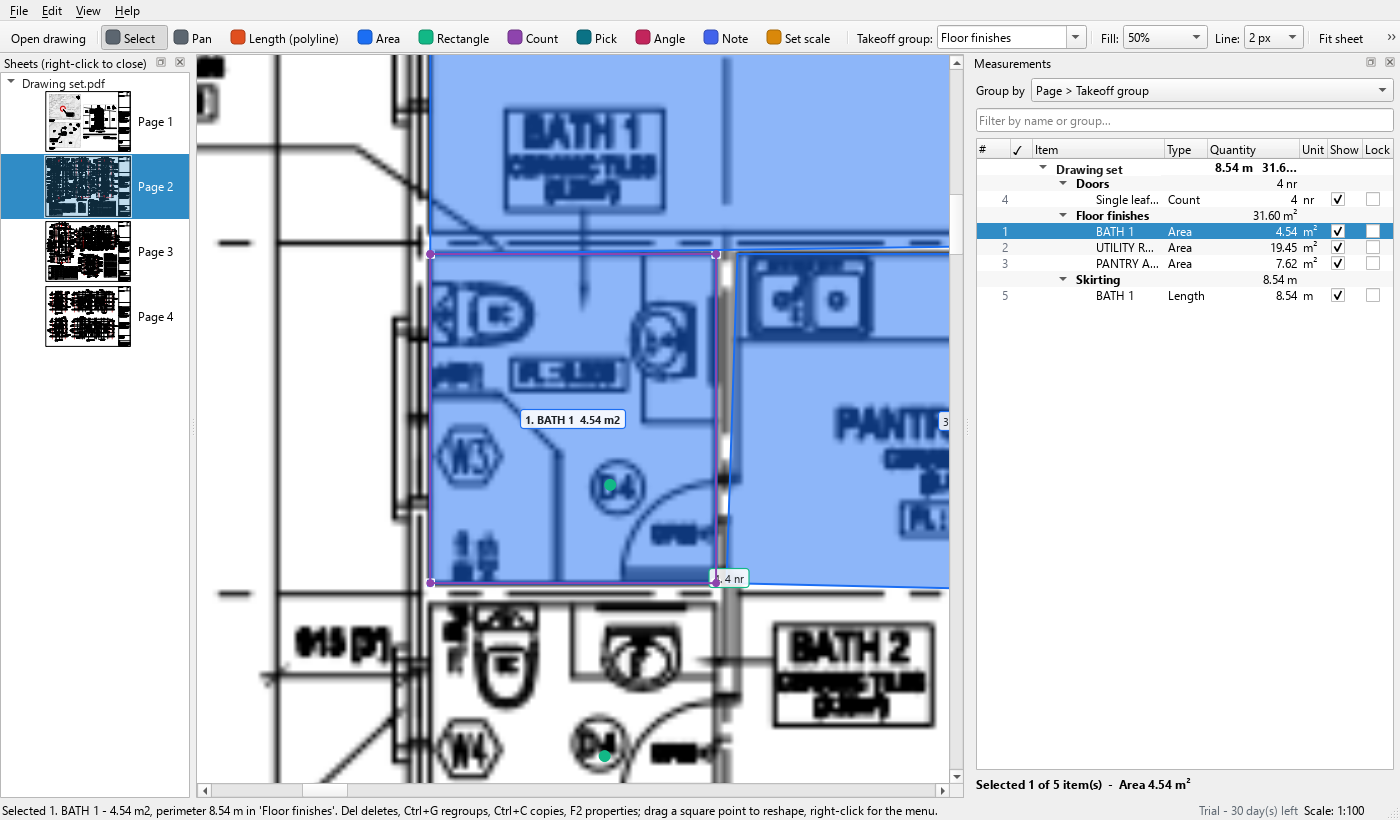
Tracing
- The running quantity floats beside the cursor while you trace.
- Esc finishes the marking (so does Enter, a right-click or a double-click). Backspace or Ctrl+Z takes back the last click — only that click; markings you have already finished are not touched — and Ctrl+Y puts it back. Delete abandons the trace.
- The tool stays on, so the next room is one click away. Esc with nothing in progress returns to the Select tool.
- Hold Shift to keep a segment exactly horizontal or vertical. Hold Alt to ignore snapping for one click.
Snapping to the drawing
The cursor snaps to where two drawn lines cross, which on an architectural plan is exactly where wall faces meet: a small square with a cross marks the corner it will take, a plain square a point on a line. So every corner you click is the drawing's own corner, not a guess. F3 turns snapping off and on. Lettering and hatching drawn as tiny strokes are left out, so the cursor sticks to walls and grid lines, not to the text beside them; on a very busy sheet the first measuring tool you pick takes a few seconds to read the lines, and the status bar says how many it found.
Follow the drawing's lines (F4, on by default for Length and Area) runs the trace along the line-work between two clicks and picks up every jog and bay on the way, so a room with an alcove is still two or three clicks. The corners it is about to take are drawn hollow; a doorway gap is never bridged. It holds on to the line the drawing drew — a polyline, an arc, and the pieces joined to it end to end — however far it runs, so on a road layout one click at each end of a kerb takes every point of its curves, and the cursor stays on the kerb when other line-work crowds round it.
Type: Line, Point or Object (second toolbar row, as in CostX) chooses how a length or an area goes in. Line follows the drawing's lines — between clicks, and while you hold the button and drag. Point goes straight from click to click, nothing followed (clicks still snap to corners). Object measures a line or an outline already in the drawing with one click — an outline as an area, a line as a length (the same as the Pick tool). F4 switches between Line and Point, and your choice is remembered.
Hold the button and drag. Click a corner, keep the left button down and slide along the walls: the trace holds on to the line you start on and lays down its corners — and every point of its curves — exactly as drawn, whatever your hand does on the way, turning onto another line only where the two meet. While you drag, the part following the drawing shows as a green line, with dots only where you started and clicked. Let go to stop (the point you let go on is placed like a click), then carry on clicking or hold and drag again. Let go on the first point of an area and it closes itself. Across a doorway or any gap in the lines it goes straight, as a click would. Ctrl+Z takes back the corners one at a time. You can press and hold at the first point straight away, or click it and then hold — even at once, which Windows counts as a double-click: a double-click only ends the measurement when the button comes up without moving.
Repeated rooms: select the finished marking and press Ctrl+D to place a copy, which snaps into position by its first corner.
7. Fix a marking
With the Select tool (S), the marking under the cursor lights up; click to select it, drag a box to select several, Ctrl+click to add or remove one, Ctrl+A for everything on the sheet.
- Reshape: drag a corner grip. Snapping applies and the quantity updates as you drag. Right-click a grip to remove that point or add one beside it.
- Continue: right-click a marking and choose Continue this marking. It reopens as a trace in progress, so you click more corners onto an area, more points onto a length or more items onto a count, then right-click (or Enter) to finish. The quantity is re-read and Ctrl+Z puts it back; Esc before adding anything leaves it as it was.
- Move: drag the marking itself.
- Rename, regroup, recolour: press F2 or double-click the name in the list.
- Readings on the drawing: each quantity is written straight on the drawing in the marking's colour, in Arial with nothing round it, the way Design Review writes it — along a length like a dimension (reading up the page on an upright wall), in the middle of an area, over the first item of a count. On an area's own fill it is a lighter tint of the colour (a deeper shade on white paper) so it does not sink into the fill. It is part of the drawing: sized in points on the paper, it zooms with the drawing like the drawing's own text, and a CAD drawing's readings take the size of its own text. Select a marking and pick a size in Text on the Formatting row to make its reading bigger or smaller; the size you pick is what new markings get, next time too. A selected marking spells out its number and name too. Prefer the old white tags with numbers? View > Marking labels > In tags, or the Labels box.
- Move a reading: point at a reading (the cursor becomes a four-way arrow) and drag it somewhere clearer. It stays where you let go — saved with the take-off, and it goes along when the marking is moved or copied. Once it is clear of its marking a thin leader points back to it. Esc during the drag or Ctrl+Z afterwards puts it back; right-click > Reset reading position returns it to its usual place. A locked marking's reading stays put.
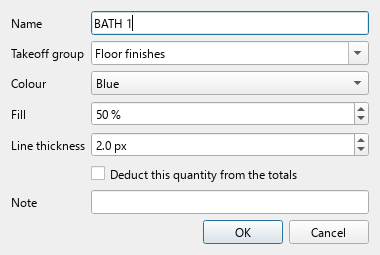
- The Properties panel: select a marking and its details are in the panel under the sheets. Type a new name or note and press Enter; pick a group or a status (Draft, Checked, Query); tick Deduct, Lock or Show. Below them are Colour, Fill, Line and Text size — the same choices as the Formatting row. Select several and the panel shows what they share, with (various) where they differ — a new name, note, Deduct tick, colour, fill, line thickness or text size goes on all of them at once, and one Ctrl+Z takes it back. (Pick several by Ctrl- or Shift-clicking rows in the list, by dragging a box round them on the drawing, or with Ctrl+A for everything on the sheet.) History lists who drew the marking and when, then every check, query, lock, rename, regroup, reshape and note since, with the name of the Windows user who did it. More properties opens the full dialog (F2) for one marking; with several selected, F2 brings up this panel instead.
- Restyle a selection: select one or several markings, then use the Formatting row — Colour (the palette, Other colour, or back to the takeoff group's colour), Fill, Line and Text. Ctrl+Z undoes each change.
- One colour for everything: Edit > Colour of all markings paints every marking the same colour (red before a print, say) — pick from the palette or Other colour. Locked markings are left as they are. Use takeoff group colours again in the same menu puts the group colours back, and Ctrl+Z undoes either in one step. The list's right-click Colour menu has the same All markings entry.
- Deduct: in Properties, tick Deduct this quantity from the totals. The marking then subtracts (an opening in a wall, a column in a slab) and exports as a negative quantity.
- Hide or lock: untick Show in the list to hide a marking (it still counts); tick Lock to protect it from being moved, edited or deleted.
- Delete with Del. Ctrl+Z (or the Undo arrow on the toolbar) undoes any of this, and Ctrl+Y (Redo) does it again.
8. The measurement list
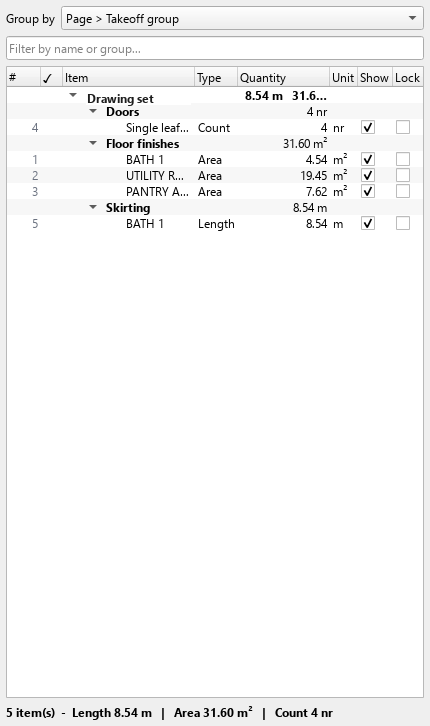
- Group by file, page or take-off group in any order; the filter box narrows the list by name or group.
- Every marking has a number that never changes and is never reused, so the reference you wrote into your bill stays good. The number also appears on the drawing.
- The summary line at the bottom sums the whole list. Select one row, or Ctrl+click several, and it sums those instead, for example Selected 3 of 27 item(s) – Area 41.20 m². Click an empty part of the list to go back to the whole total.
- Click a row and the drawing jumps to that marking. Selecting on the drawing highlights the row.
- Copy rows with Ctrl+C and paste them into your own spreadsheet; Ctrl+Shift+C copies just the numbers, one per line, for a measurement-file column.
- Perimeter from an area: select a room, set the toolbar group to Skirting, press Ctrl+Shift+P, and the room's outline becomes a length in that group. The area is untouched.
- Checking a take-off: double-click the ✓ column to tick a row off, or right-click it for Draft, Checked and Query. The summary line counts how many are done.
- Columns: right-click the header to hide the ones you do not need.
9. Export to Excel, print to PDF
File > Export to Excel writes a workbook with two sheets:
- Measurements: one row per marking with Take-off group, Item, Type, Quantity, Unit and Perimeter (m), with a filter on the header row. The perimeter is given for every area, ready for skirting or formwork.
- Summary: the total for every take-off group and unit.
Export to CSV gives the same columns for other software. Cells hold the exact value; the decimals you see are set under View > Quantity decimals. Deductions come out negative. Angles and notes are never exported: they are remarks about the drawing, not quantities.
Print to PDF
File > Print to PDF (Ctrl+P) puts each sheet on its own page with the markings drawn on it, their numbers and readings, a header with the file, sheet, scale and date, and a legend of the take-off groups with their totals. Choose this sheet or every sheet, A4 or A3, and whether the drawing prints in full colour, greyscale or monochrome; the markings are always in colour, so they read clearly on a grey plan. Text boxes print as words. Send the PDF with your bill, or keep it as the record of what was measured.
10. Save your work
- Ctrl+S saves a
.tkoproject file with the drawings packed inside it, so one file opens on any PC on its own — send it to a colleague, archive it, nothing to relink. - The first save is offered beside the first drawing you opened, under that drawing's name (
Ground floor plan.pdfbecomesGround floor plan.tko); change the folder or the name in the dialog if you want it elsewhere. - If a drawing has been moved or deleted since it was opened, the save still goes ahead and the status bar names what could not be packed.
- Double-click any
.tkofile to open it.
11. Trial, licence and subscription
The trial runs for 30 days with every feature on. When it ends, new measuring stops, but everything you have measured stays open: you can still read every quantity, save the project and export it. Your work is yours.
To subscribe
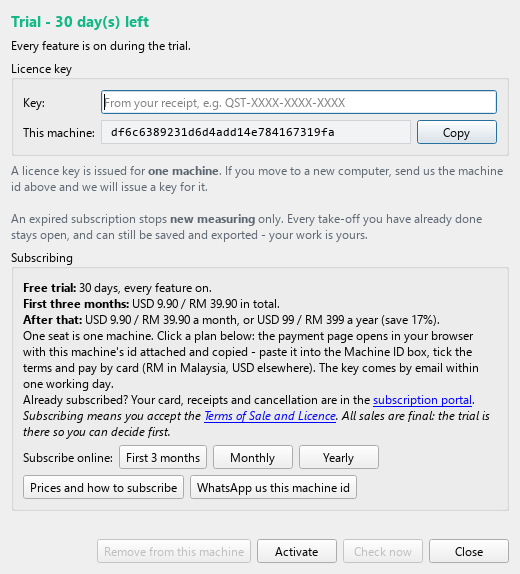
- Open Help > Licence and, under Subscribe online, click the plan you want: First 3 months, Monthly or Yearly. The payment page opens in your browser and your machine id is copied to the clipboard.
- On the page, paste the id into the Machine ID box, tick the terms and pay by card. Prices show in RM in Malaysia and in USD elsewhere; on the first-three-months plan the code
FIRST3is already filled in. The same three Subscribe buttons are on the website if you prefer to start there. - Your licence key arrives by email within one working day (and on WhatsApp if you gave a number). Paste it into the Key box and click Activate. That is all; the key works offline.
| Plan | Price |
|---|---|
| Free trial | 30 days, every feature |
| First three months | USD 9.90 / RM 39.90 in total |
| After that, monthly | USD 9.90 / RM 39.90 a month |
| After that, yearly | USD 99 / RM 399 a year (two months free) |
One key works on one machine. Moving to a new PC? Click Remove from this machine in the Licence dialog, send us the new machine id, and we issue a key for it.
Prefer bank transfer? Click WhatsApp us this machine id and we send the details. To change your card, download receipts or cancel, use the subscription portal, linked in the dialog and on the website; a cancelled plan runs to the end of the period you have paid for.
12. Keyboard shortcuts
| Keys | Does | Keys | Does |
|---|---|---|---|
| Ctrl+O | Open drawing | S H | Select, Pan |
| Ctrl+S | Save project | L A R C | Length, Area, Rectangle, Count |
| Ctrl+K | Set sheet scale | P D N K | Pick, Angle, Note, Set scale |
| Ctrl+Shift+K | Correct scale from a reading | Esc / Enter | Finish the trace |
| Ctrl+0 | Fit sheet | Backspace or Ctrl+Z (while clicking) | Take the last click back (Ctrl+Y puts it back) |
| + - | Zoom in, out | Shift (held) | Horizontal or vertical only |
| Space (held) | Pan | Alt (held) | No snapping |
| Ctrl+Shift+Z | Zoom to selected marking | F3 F4 | Snapping, Follow the lines |
| Ctrl+Z Ctrl+Y | Undo, redo | F2 | Properties |
| Del | Delete selected | Ctrl+G | Move to take-off group |
| Ctrl+A | Select all on the sheet | Ctrl+D | Copy marking to another spot |
| Ctrl+C | Copy rows | Ctrl+Shift+P | Perimeter from an area |
| Ctrl+Shift+C | Copy numbers only | F11 | Hide the side panels |
| Ctrl+W | Close current drawing | F1 | This manual |
| Ctrl+P | Print to PDF | Ctrl+R | Rotate sheet (Shift: the other way) |
| T | Text on the drawing |
13. Getting help
- WhatsApp +60 12-328 0864 or email wequantitysurveyor@gmail.com. A screenshot and the drawing, if you can share it, get you an answer fastest.
- Help > Check for updates tells you when a newer version is out and opens the download page. The program never downloads anything on its own.
- Your drawings and measurements stay on your computer. The program has no account and uploads nothing.